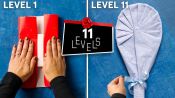
11 Levels of Holiday Gift Wrapping: Easy to Complex
Released on 12/06/2023
I'm Sophie Liard,
and today I've been challenged
to break down gift wrapping into 11 levels of complexity.
[energetic music]
As we go through these levels,
just remember this is gonna take some practice,
so don't give up.
As a disclaimer, this is my interpretation of the challenge.
Level one, box and bow.
We're gonna have three versions of this level.
We're starting with the box and bow
because it's the easiest one to master.
It's also probably the one that people would use the most.
So a box is the same measurement every time.
The paper should go just over halfway up the side
and then cover the top of the gift,
and that's how you would measure.
And this applies to all sizes.
I don't worry about whether my scissors
are cutting a straight line or not.
I will just tidy it up
by folding the edge of the paper over
before I start wrapping.
Just straightens everything out.
You're just going to cover the box from left to right.
Over the top, just a little bit of overlap.
Add a piece of tape here.
Fold the sides in
until you get to your last side of the box.
For a box, I'm just happy to use standard tape.
So when you're doing a ribbon,
you have one long side and one short side
so make sure you measure it correctly...
[jazzy music]
without cutting the roll first.
[jazzy music]
So here's another method.
It'll measure exactly the same,
but it will be a different technique on the side.
Tidy up by folding the edge of the paper over.
Left fold, right fold, tape.
And then when you get to the side,
you're going to fold a diagonal line
and then crease your sides
and that would make your box look super, super sharp.
Let's just make sure your paper really hits the side.
And the same when you're going in now.
You're gonna take the paper right into the box
before you crease.
Fold up, tape.
You can decorate it with a nice bow.
It feels natural for me to hold it top corner,
short side holding with my thumb.
You're gonna go over one corner, then under the next,
then over the next corner, then under the next.
And that should bring you back to the middle.
Another thing that helps with bows
is if you keep your loops really small,
then you can always make them bigger afterwards.
[upbeat music]
This is like when you found that one present,
you haven't wrapped and you've got one tiny bit
of paper left and it doesn't fit.
And it's not the neatest of wraps,
but it's that or go to the shop, so we will do this.
You're just gonna turn it on an angle.
[jazzy music]
And then it should fit.
It's just a great way
if you've just got a little bit of paper left
and you've still got a gift left,
it's quite likely that a box will fit
if you turn it at a diagonal.
Next up, level two, sweater.
The difference with dealing with a box versus a sweater
is that your box has nice, flat, hard sides
that we don't have on clothing.
So to fold the sweater, you're gonna fold in the sides,
and fold down the arms, and then fold the bottom up,
and then fold the top.
Folding with tissue is my absolute fav.
If the tissue paper's too small, it doesn't matter,
you just layer it across on the table,
overlap your second piece,
and it will still wrap in exactly the same way.
What you're gonna do first
is just fold the paper over the sweater
and then tuck in each of the ends into the sweater.
Level three, the book.
So the books are a higher level
because you can do quite complex wraps with them
just purely because of the shape.
They're kind of a box, but they're very flat.
We're gonna have three versions of this level.
The paper should go just over halfway up the sides.
I just measure it by lining it up with the side of the book.
It's gonna come right over the book like this.
So after we've measured out the paper,
the first fold is to make your card slot.
It's essentially just quite a big pleat,
and really from there on, you can just wrap your book
as we've taught you in level one.
Right fold, left fold, add a piece of tape,
fold down, fold up, card slot,
and you can decorate it with a nice bow.
[scissors snipping]
[jazzy music]
With the second book wrap,
we've changed the shape of the card slot.
Same kind of measurement as before.
You're going to fold a diagonal line
and then fold up.
The best paper to use,
especially if you're starting,
get some wrapping paper that has a real abstract pattern on
and that way you are not gonna have to
worry about whether the lines are straight.
This is the front of the gift,
so you wanna put the bottom down first
because then from the top, this bit will sit that way.
And if you do it the other way,
you'll be able to see it from the top.
The detail. My boss always you say, Retail is detail.
And then use a corner bow,
which will sit flush against the shape of your card slot
and just all ties in really nicely.
Pleating can go many places.
You can make your pleats any width you like.
It's not quite the right size,
and you can open your paper back up and replete.
I mean I do that all the time.
If you are just starting with pleating,
I would recommend starting with vertical pleats
and practicing with those.
And then you can change to diagonal pleats,
which are really fun.
It's nice to keep your pleats nice and tight.
I'll just turn it over.
We don't wanna see the tapes,
we don't want tape on our beautiful pleats,
so we use double sided, so it's hidden underneath the wrap.
Tape back down, and then you wrap the sides.
Level four, stocking stuffers.
So things that work really good for the gift wrap method
is items like this, so they've got shape here,
and then a shape here.
I would definitely be wrapping little cuddly toys in there
just because look, they're just an awkward shape.
So you're gonna fold the paper into thirds.
And to measure it,
just make sure your paper covers the gift
that you're wanting to put in the bag.
We use double-sided tape.
Then you're gonna make the bottom of the bag
by folding the paper up
and then pushing in the sides.
Tape, then you're gonna move to the sides of the bag.
You are gonna fold those in
so they meet the corners of the bottom.
[jazzy music]
Then you are gonna fold it all out.
And making sure you put the gift in the bag,
you can then start to close your bag up.
You're going to fold a diagonal right and then left,
[jazzy music]
and you can decorate it with a nice bow.
Tape here. So multiple items, cuddly toys, awkward shapes.
Also tiny things like cosmetics,
they're also really, really difficult to wrap.
You can make a little gift bag
and put all three in the gift bag as well.
Level five, cubes.
So a cube, all the sides are the same area.
With the boxes that we did at level one,
there was always one side shorter than the other,
so it was a slightly different type of wrap.
If you were going to wrap your cube with a standard wrap,
then you would absolutely use
the same measurements as a box,
which we showed you in level one.
But for the top of the box, we will need some extra paper.
So we've just cut a little bit extra for the top of the box.
Create your shapes by folding the paper in to the middle.
[light airy music]
Start with one side, you're gonna fold up.
You'll do this for all four sides.
You just go round your cube and folding into the middle,
fold into the middle,
and it just gives you this beautiful, kind of,
like a fire swirling shape on top of the cube
that's perfectly symmetrical.
Level six, box with no tape.
To start with the no tape method,
you do need to get the right measurements,
and this time you are gonna measure on a diagonal
and make sure the corners go over
the top of the box on both sides.
It's definitely easier to use a thinner paper,
so shop bow paper.
You need a lot of flexibility in it.
What can go wrong is so many things.
For me personally, it's usually the measurements.
If you've got the measurement just too wrong,
not just slightly wrong, that's absolutely fine,
but if you've got a massively wrong measurement of paper,
it will make the wrap so much harder.
You're gonna start with one corner
and just make sure it comes over the box
and it just hits those top two corners.
And then to start the sides,
you're going to run your nail from the box all the way out.
And this is just to give the paper some creasing
and that will make it a lot easier
for you to then do your next fold.
And the next fold, you're then going to fold the sides in
and fold your next corner over the box.
And you're gonna repeat this on the following corner
until you get to your last side of the box.
Level seven, cookie tin.
This will work for all cylinders, this level.
Think about pillar candles maybe,
anything that's that type of shape.
You've got a cylinder and then a flat top and a flat bottom.
So you're gonna measure.
The paper should go just over halfway up the sides.
Tape. My tip to make sure
all your pleats are the same size
is just to use your finger in between each pleat
when you are pulling the paper towards the center.
Just remember you are repeating the action.
Turn your shape, repeat,
but use your finger to get the pleat the right size.
If you want a bigger pleat,
then you're gonna put two fingers down.
If you want even bigger, you can put three.
It'll just help you get really even sized pleats
all the way round.
Once you've done your first one,
just repeat it on the next one, repeat on the next one,
and you'll get it beautifully the same
until you get to the end.
Level eight, the candle.
This is just fun, yeah?
And quite often candles have got funny lids
or they're kind of going out in a funnel type shape.
So this is just a great way to wrap it up
and make it look really fun.
We've got the shape that we need.
Start with one side and then fold the bottom up.
The tricky part is definitely cutting the corners
so you get the right shape
to be able to tie the ends with your ribbon.
I quite like to class myself as a home gift wrapper,
so kind of like a home baker.
Everything with gift wrapping can be trial and error,
can be practice, and you can start again.
Level nine, the wine bottle.
I feel like with the wine bottle,
I mean we give wine as a gift so often,
there's no way to wrap this
without knowing we're taking wine.
So, I tend to encourage people just to wrap it
as the wine bottle.
Tissue paper is the easiest to use
when doing the wine bottle,
and I would highly recommend using it.
I held onto it.
I mean you could, at some point, tape it, I guess,
but it's nice to keep your pleats nice and tight,
and even if it does fall, it's easy to put back together.
That's the beauty of tissue paper.
We're using a bow, we're using pleat,
so there is some technique involved
and it, let's face it, it's a very odd shape,
but it's a gift that's given often.
So, it deserves a little wrap.
Level 10, soccer ball.
I just realized how I'd never say that word.
Level 10, football.
Yeah, this was super unusual
and I appreciated the challenge on this one.
You've not only got a sphere,
but you've got it in a triangle box.
Whoever designed this
obviously didn't want it to be gift wrapped.
So it's a slight variation on the gift bag, this level.
It just has a little bit different finish.
So, you're gonna fold the paper into thirds.
Then, you're gonna make the bottom of the bag
by folding the paper up,
making sure you put the gift in the bag.
The way we turned it on its side,
it's just a completely different shape,
but the premise is the same.
Level 11, tennis racket.
I love a challenge.
And I thought, Okay, so what shapes have we got?
So what we do is we break down the tennis racket
into different shapes.
And what we've got is
the top of the tennis racket with the strings,
which is a round shape.
And then we've got the bottom,
which is kind of like a pole I would say.
What I would think about is wrapping the top half first
and then moving on to the bottom half using the same paper,
but two separate sheets,
and then bringing it together.
We actually pleated the top half of the racket,
which I thought looked very lovely.
And then we brought the paper down to the bottom.
And then we used part of the gift bag method
to be able to wrap the handle of the tennis racket
because actually the handle
isn't quite a straightforward shape,
neither round or has sides.
So the gift bag method was a really good one,
and then we just were able to connect them together.
I think it just turned out really nice.
I hope that anyone who gets all the way to level 11,
I really hope that you take away the repetitive techniques
that you can use for the different shapes,
and that you can see when you pick up your next gift,
what technique you can match to wrap that gift.
And if you don't get it first time
or you don't get it second, third, or fourth time,
know that that's happened to me too
and practice makes perfect.
Thank you so much for watching.

16 Levels of Piano Composition: Easy to Complex

21 Levels of Skateboarding: Easy to Complex
6 Levels of Knife Making: Easy to Complex

11 Levels of Origami: Easy to Complex

10 Levels of Ice Sculpture: Easy to Complex

13 Levels of Beatboxing: Easy to Complex

11 Levels of Self-Portraiture: Easy to Complex

26 Levels of Yo-Yo Tricks: Easy to Complex
22 Levels of Cardistry: Easy to Complex
24 Levels of Balisong Flipping: Easy to Complex

13 Levels of Pumpkin Carving: Easy to Complex

21 Levels of Dunking: Easy to Complex

15 Levels of Pool: Easy to Complex

12 Levels of Graffiti: Easy to Complex

15 Levels of Turntablism: Easy to Complex
11 Levels of Prosthetic Makeup: Easy to Complex
Levels of Knot Tying: Easy to Complex

13 Levels of Drumming: Easy to Complex

21 Levels of Pen Spinning: Easy to Complex
21 Levels of Ballet: Easy to Complex

25 Levels of Freestyle Soccer: Easy to Complex

9 Levels of Pickpocketing: Easy to Complex
11 Levels of Holiday Gift Wrapping: Easy to Complex